

Volume 15 · Issue 1 · January/February 2005 | Download PDF
by Christina Skoski, MD
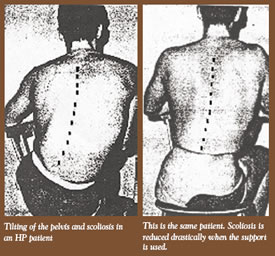 One of the most common complaints of new patients who have had an amputation through any part of the pelvis (known as hemipelvectomy or transpelvic amputations) is discomfort and difficulty in sitting upright. This is because they’ve lost the “sitting bone,” or ischium, which provides the bony structure or support on the amputated side. Constantly leaning to one side because of this missing support can cause low-back pain and may contribute to the development of functional scoliosis (an abnormally curved back) over time.
While a soft pillow may suffice for hip-disarticulation amputees, firmer support is usually required for those with only soft tissue on one side. A classic “sitting socket” is nothing more than a device that wraps around the lower torso and provides a firm, level sitting surface – a socket without the leg attached. Although these sitting sockets have been recommended for people who use crutches and wheelchairs exclusively rather than a prosthesis, the older designs can be quite cumbersome, and many people rejected wearing them.
 New “space age” materials can now be used, however, to fabricate a very acceptable and adaptable alternative known as “the pelvic leveler.” Unfortunately, since this level of amputation remains quite rare, not all hospitals, surgeons or prosthetists are familiar with this device, and many patients are still discharged from the hospital without one.
Simply put, the pelvic leveler is a lightweight, portable, firm, and comfortable support device that should be very easy for any prosthetist to fabricate.
Basic Instructions for Fabricating a Pelvic Leveler
1. Make a cast of the body like you are casting a socket for a prosthesis, concentrating only on the lower portion of the amputated side. This cast does not have to be precise and can be done over bandages on a new amputee or carved freehand if necessary. This provides a negative mold from which a positive mold can be created from plaster.
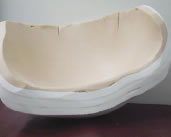
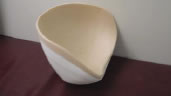
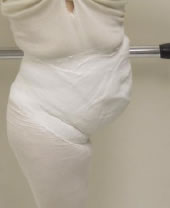 2. Place a sheet of Plastizote over the positive mold and vacuum form it. This material, which is flesh-colored in the pictures, goes next to the body and is relatively soft. Around this, place several layers of Pelite, a low-density foam material that is firm in texture, to provide support. (The Pelite is white in the pictures.)
3. Gradually sand away the excess Pelite until the patient can comfortably sit up straight using it. The overall size and shape depends on the size of the patient and what he or she requires to sit comfortably.
4. The outside can be covered with a layer of leather for durability.
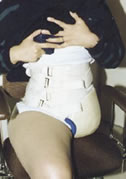
 5. The pelvic leveler can be carried around like a pillow and placed under the amputated side outside the clothing as needed. It can also be held in place by a compressive garment like a panty girdle with one leg sewn up. (Improved Suspension Method for Transpelvic Sitting Prosthesis, John Michael’s Corner, June 2004 (http://www.oandp.com/news/jmcorner/2004-06/2.asp)
6. Another option is to hold it in place with a piece of neoprene or elastic over and around the hips and attached with Velcro. (Trans-USA Hip Disarticulation/Transpelvic Prostheses Tour: Part Two – Rochester, MN, John Michael’s Corner, October 2003 (http://www.oandp.com/news/jmcorner/2003-10/2.asp?searchquery=transpelvic)
 The pelvic leveler offers many advantages to hemipelvectomy amputees. It is infinitely adjustable and can be made as large or small as the individual needs. It may also serve a cosmetic function by rounding out a missing hip. Even prosthesis wearers may benefit from this support when they take their leg off and are sitting at home relaxing or exercising.
About the Author
Christina Skoski, MD, has been a hemipelvectomy amputee since losing her leg to cancer as a teenager. Today, she is a clinical anesthesiologist and serves as a member of the Amputee Coalition’s Medical Advisory Committee. She created the first Web site specifically for pelvic amputation levels (http://www.hphdhelp.org).